Monday 22 August 2011

Photo Glossary - 13 - Exposure Compensation

Exposure compensation is a tool provided by most cameras which allows the photographer to manipulate the exposure of a photo in automatic or semi-automatic shooting modes. It is a relative scale, centred around the exposure selected by the camera and can be used to increase or decrease the exposure of the photo.

Exposure compensation is useful in situations where the camera’s reflected light meter does not read correctly (e.g. a beach or snow field) or when you have a complex lighting situation such as a sunset with objects in the foreground or light shining through leaves.

Friday 12 August 2011

Photo Glossary - 12 - Light Metering

Light metering is the process of measuring the amount of available light and is used to calculate the required camera settings for the correct exposure of a photo. There are two types of light metering in photography, incident light metering and reflected light metering.

In incident light metering the measuring device is held next to the subject and measures the actual light falling on the subject. It gives a very accurate measurement but is cumbersome and time consuming to use. It is usually used in studio situations rather than field work.

In reflected light metering the light meter is located in the same location as the photographer, usually within the camera itself. This is the technique used in all automatic and semi-automatic cameras. Because it measures the amount of light reflected off the subject it is affected by the colour and reflectivity of the subject. For instance, in any given lighting situation, a black road will reflect less light than a white wall. Cameras are calibrated to expect neutral brightness subjects, so scenes with lots of light colours often end up underexposed and those with dark colours overexposed. To compensate for this, photographers sometime use a grey card or neutral brightness object in the area around them (such as grass) to set their exposure and then use those settings for the entire shoot.

Sunday 31 July 2011

Photo Glossary - 11 - Histogram

In photography a histogram is a graphical indication of the brightness content of a photograph. In Excel terms it is a column graph with brightness on the X-axis (running from black on the left to white on the right) and number of pixels on the Y-axis. The curve shows the number of pixels of each brightness in the image so a dark image will be clustered towards the left and a bright image will be clustered towards the right.

Many cameras can display a photo’s histogram, either with the review function or live while shooting. It can be a very useful tool to check your exposure, especially when shooting in difficult lighting conditions, such as a combination of bright and dark in the same frame.

Monday 11 July 2011

Photo Glossary - 10 - Macro Photography

Put simply macro is taking photos of very small things. True macro photography requires a magnification of 1x (or a ratio of 1:1), in other words you must be able to fill your entire photograph with something the same size as your camera’s sensor. In order to achieve this you need specialised equipment such as a dedicated macro lens for an SLR camera or a magnifying attachment for a compact.

This does not mean however that you need expensive kit if you want to take photographs of small things. Almost every compact camera will have a macro mode (normally represented by a flower) which allows your lens to focus closer than normal. It may not give you true 1:1 but it will definitely get you close enough to take some interesting shots. Just remember to turn the mode off before trying to take normal photographs again!

Macro photography has its own challenges. Because your subject is so close to the camera you will find that the photographs will have very shallow depth of field. The depth of field and proximity also mean that it is very susceptible to movement. Ideally you want to shoot with a small aperture and fast shutter speed, which means that you need a lot of light if you want the shot to be sharp and in focus. Alternatively you can use a tripod, which is cumbersome to move around (particularly when chasing bugs) but gives you a lot more control.

Thursday 7 July 2011

Photo Tip 1 - It's Not About the Camera

Hi everyone, welcome to my first photo tip.

One of the wonderful things about photography is that there are so many different ways to make an image stand out. There are more opportunities and techniques than you can count and your imagination is your only true limitation.

There may be some who’ll disagree with me, but from my point of view there are no “rules” in photography. At the end of the day if an image looks good or has impact, it is a success. That said, there are many valuable guidelines, things that have been found to work over the years. Some of these have been around far longer than photography and were inherited from older art styles such as painting.

Over the next few tips I will be exploring some of these guidelines. You may find them obvious but don’t discount them. They are all potent and can improve your photography without much effort.

Enjoy.

It’s not about the camera 

I’d be lying if I said that expensive cameras don’t contribute to the quality of a photograph (clearly they do or professionals wouldn’t use them) but fancy equipment on its own does not take good pictures.

What a high-end camera really does is give the photographer more options and more control. It allows experienced users to set up their camera exactly the way they want it. Fortunately though, you don’t need to shoot in full manual to capture beautiful, powerful images.

Whatever the subject or style, YOU contribute more to your photography than your camera ever does. A well composed, nicely lit picture from a camera phone is always going to be more effective than a blown out, ill conceived shot captured on a Hasselblad (which can cost as much as a small truck).

The trick is to do the best with what you have. Learn the limitations of your equipment and squeeze everything you can from it. It’s easy to dismiss a photo taken by a master as being a product of their expensive gear, but I guarantee that the same master could produce something spectacular with the camera in your pocket. To illustrate this point photographer Chase Jarvis wrote a book entitled “The Best Camera is the One that’s With You”. It’s a photo book filled with images that he took on his iPhone and the results are amazing.

So whatever you do, don’t stand back and blame your tools. Rather use what you have and start working towards your first master piece.

My first digital camera was a Canon IXUS 300, a 2.2Mp point and shoot with a 3x zoom and no manual settings. That camera lived in my pocket for years and took some photos that I am still proud of. More importantly it was a fantastic teacher. It taught me about light, colour and composition. It taught me to look for the photos around me all the time. Best of all, it taught me that I love photography and convinced me to save for my first SLR.

The photo below was taken on that very camera. In fact all of the photos in the next few tips were taken on that camera or ones like it.
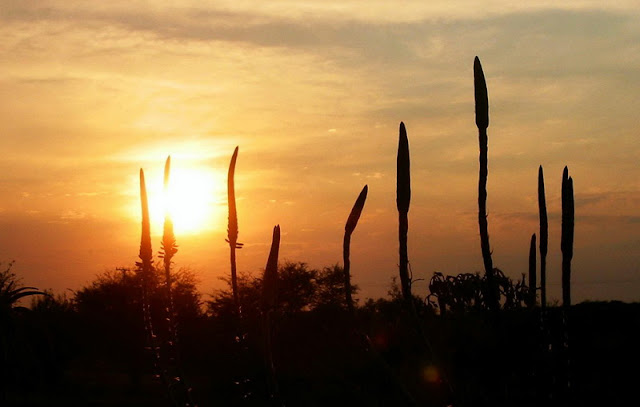
Desert Sunrise - Canon IXUS 300 (2.2Mp)
So, whatever your equipment, however experienced you are, grab your camera and get out there.  Look for the shots, keep shooting, keep learning and work towards your next masterpiece.  Remember, photography is not about the camera… it’s about you.

Saturday 2 July 2011

Photo Glossary - 09 - Exposure Locking

Just like focus lock, most cameras have an exposure lock feature.  When using an automatic or semi-automatic mode the camera uses light information from the entire frame to decide how to expose the photo (there are actually several different exposure modes that a camera can use, which will be covered later, and exposure lock works with all of them).  If you wanted to take a photo of someone sitting in shade with a bright blue sky behind them the camera will see all of the brightness and set the exposure for that, leaving your actual subject under exposed.   If you use exposure lock however you can set the exposure for the subject directly, ensuring that the important part of the photo is well exposed.

Like the focus lock this is usually done by pointing the camera at the area that you want well exposed, half depressing the shutter button, then composing the photograph and pressing the button in completely.  Most cameras will lock the focus and the exposure at the same time.

Tuesday 28 June 2011

David and Miné's Wedding - 2011-06-18

Hi everyone,

On Saturday 18 June I attended the wedding of my good friends David and Miné in Cape Town. The ceremony was at St. Georges Cathedral, which is spectacular, and the reception was held at Kelvin Grove. The professional photo shoot was in the city around the cathedral, which made for some fantastic images.

It was a beautiful wedding, full of happiness and a lot of memorable moments.
The Happy Couple
I wasn’t the official photographer for the day so I tried to stay out of his way as much as possible (I did have some serious lens envy though, he was shooting with a 5D MKII, 24-70 f2.8 and 70-200 f2.8, plus soft box and matching beautiful assistant). I was a groomsman, which meant that I was present for the groom’s preparation and got a few photos that he didn’t.

I spent most of the day shooting with my 50mm f1.8 once again. The reason this time being that I was doing a lot of indoor shooting and didn’t want to distract people with a flash. My 50mm is a very hard working little lens that has served me well over the years. Unfortunately the focus mechanism is getting a little warn and I’m starting to miss shots because of it… hmmm, might be time to upgrade to the 50mm f1.4…

Congratulations to David and Miné. I wish you all that is good in your life together.

The complete gallery can be found here.

The Groom Preparing
Last Minute Speech Writing
Austin 16/6 - The Getaway Car
Detail of Miné's Dress 
Epic Android Wedding Cake
The Dixie Swingers playing after the ceremony